Sunday, May 20, 2018

Baby Girl Shower

Confession: now that I have three boys and have been solely in the boy-camp for a lot of years now, I find myself completely and totally overwhelmed in the baby girl section of any store. I pretty much freeze and am unable to pick anything out for gifts. I am just so far out of my comfort zone. It's a little bit funny. In fact, the further away from having a baby I get, the more overwhelmed I am by the purchase of any baby stuff.
So, when I decided to co-host a baby shower for a friend who was having her first girl, I decided to make her gift from me be the diaper cake which served as the décor for the shower.
I had never made a diaper cake before, but decided to do some research and figure it out. It turned out to not be a big deal to construct. I had come up with how I wanted it to look, and went to work on it.
This cake required 118 diapers (two packs of 59 size 1 Babyganics diapers), a wood dowel cut into a couple of pieces the height of the cake for stability, a $2 charger plate from Michael's, a spool of ribbon, and 3 identical silk bouquets from a $5 bin at Michael's. The mother liked peonies, and the flowers I chose seemed like they could either pass as peonies or roses. I loved the color scheme - sort of peachy-pink, hot pink, and red.
To construct the cake:
1) Roll all diapers individually with a rubber band, tucking the colored band inside so that most of what is visible is just white diaper.

2) Then group the diapers in rounds, wrapping a rubber band around each ring. Create each of the three tiers this way.
(This is the bottom layer with the charger underneath.)
3) Stack them on top of the plate, individually.

4)Work the dowels down into the cake and cut them off so that they are flush with the top of the cake. The dowels keep the cake remarkably sturdy.

5) Wrap the ribbon around the center of each cake layer tightly, and hot glue the ribbons together, but if possible, do not hot glue to the diaper (it won't be usable which is not the end of the world, but not the goal).
6) Arrange the flowers around the cake and if necessary to anchor with glue, try to hot glue the flowers to the ribbon, instead of the diapers, again, so that the diapers remain functional.
And that's it! It looks great, makes a nice centerpiece, and gives the mom-to-be a boost on diapers! I'm totally going to make another one of these if I get the pleasure of hosting another shower one day.

Wednesday, May 2, 2018

Break Out the Mos Eisley Canned Tuna! It's Star Wars Day Food!

A few days ago, knowing that May was fast-approaching, I asked my Facebook friends for ideas of what to serve my Star Wars-loving children on Star Wars Day (May the 4th). A very talented and awesome friend went to town with some amazing puns and got so into it she lost some sleep over it. Since lots of her friends wanted a way to pin her incredible list of ideas, I volunteered to post this absolutely amazing list on my blog so that many more people could partake of her exhaustive list.  So without further ado, here is the list of Star Wars food options - even lots of ethnic options! - to make all your May the 4th dreams come true (as posted to Facebook by the incredible Margaret Peterson):

"For all of your May the Fourth (Star Wars Day) dining needs:
If you’re in the mood for Italian there are many Wampas-tas to choose from: Boba Fetticinni, Obi-Wan Canolli, or Bow-tie Fighters. Or maybe you’d prefer Pizza the Hut*, Rey-sotto, or Poe-lenta.

French maybe? Try DeathStarGo, Coq au Finn, RataR2Dtouille, Princess Souffléia, Lardon Calrissian, Wilhuff Tartine, Cheese Fondooku, Macaron Solo, BouillaRebelBase, or Emperor PalpaGratin.

How about Indian? Darth Vada, Darth Dahl, Obi-wan Tandoori, Padmé A-masala, Laddu Calrissian, Rose Tikka, Lamb Finn-daloo, SaMos(Eisley)as, Cucumber Rey-ta, Padowan Papadum, Princess Lassi, Saag Poe-neer, aLuke Gobi, and Naan Solo (or maybe Alder-naan) are all good choices.

Would you rather eat Mexican? Try the Huevos Kylo Rencharros, Darth Verde, Maize Kanata, Rose Taco, Flan Solo*, Admiral Ackbar-itto, Barbacoa Fett, Poe-zole, Chile Rey-leno, EnchiLeia, Dulce de Luke, Darth Molé, Chewie-changa, Lando Chorizo-an, and EmpanYodas. Or go Tex-Mex with Fritos Stormscoopers and Seven-Leia Dip*.

Would Chinese hit the spot? WonTaunTauns (also known as Padowontons* or Obi-Wanton Kanobi), C3POrange Chicken, Rey-king Duck, Egg Foo Yung Padowan, ChewBakChoi, Mon Mothma-po-do-fu, Szechuan Solo, Fortune Wookies, Kung Poe Chicken, and Shark Finn Soup are all great dishes to make in your E-wok.

Or maybe Japanese food like Rey-men noodles, Supreme Leader Poke, Bento Solo, YakiYoda noodles, Udon Jinn, a Tatuna-ine Roll, General Leia Onigiri, Katsu Ren, or Tem-Poe-ra is more your style.
What if it’s just all Greek to you? Then try Tzatziki-Gon Jinn, Han-akopita, Count Dooku-scous, Hummus Eisley, Souv-Luke-i, Boba Ganoush, Philo Ren, Padmé Ama-dolma, Mox Moussakanata, and some Chewbaklava for dessert.

But what if you just want to eat at a good old American Diner? Start with some Chicken Finn-gers and Mashed Poe-tatoes. Or maybe you’d rather have X-chicken-wing fighters and some Fry Fighters. Admiral AckBar-B-Que, Darth Taters, Hoth Dogs, or an R2-DTuna Melt made with Mos Eisley Canned-tuna. Order an Iceberg Wedge Antilles Salad, Yodagurt, Endor-itos, or Watto-melon on the side. On the light side, try a Bagel-bah with Lox Kanata. Wash it all down with a Captain Fanta, Yoda Pop, Qui-Gon Jinn and Tonic, or Iced Emperor Palpa-tea. And for dessert, choose from Banantha Cream Pie or a big slice of Aunt Baru-barb pie.
Hope that got some Endor-phins flowing!
(most of these are from my demented brain, but the * ones were shamelessly stolen from other people, but I can't remember where I saw them- obviously, there are many people on the internet who have also independently come up with many of the other ones that I think are my creation, so I'm happy to be one of the great minds that thinks like you if I've inadvertently stolen them - MP)"

Some more random ones that I came up with:
Aunt Beru-berries, BB Tom-8-oes, Hoth Chocolate (served Luke warm???), Jakku-cumbers, Obi-Wan Corn-obi, Tuscan radishes. And of course, Calamari is always a good choice for May the 4th.

One of my son's lunches:
You can download a decently convincing-looking Star Wars font for free if you google "Free Star Wars Font." I just typed out these foodie-puns onto labels, added some Star Wars stickers, and voila! A very festive lunch.

For dinner, we went with a "Mexican" theme (in quotes, because what's more American than a burrito?).
 We had Admiral Akbar-itos. The ingredients were: Maize Kanata (a nice fresh salsa made with roasted corn, cilantro, onion, and green pepper), Lavender Cal-rice-ian (have you tried purple rice? If not, you should because it has great flavor - find it in bulk food sections in stores like Whole Foods), POE-rk, Han Solo Cream (lame, but it worked), C-3Pico, Cheese-bacca, Tractor Beans (a runner up was REY-fried beans), and Darth Verde sauce.
Also, we served Yoda Soda, which was a little bit of sprite with a small scoop of sherbet in it (I could only find rainbow, but lime sherbet would definitely work better).
Dessert was Storm Scoopers of the Dark Side Sundaes (AKA: dark chocolate ice cream) with a Wookie Cookie, and topped with Mace Whip Cream. 

Saturday, March 17, 2018

Believing in Grace

At church, I have been given the opportunity to work with the teenage girls of our congregation. As such, one of the things I take turns doing is teaching Sunday lessons. Since a minor stroke of genius occurred here, I decided to share it on the blog. Grace can sometimes be a tricky concept to understand in the LDS church, and so maybe someone out there will find this lesson idea (and accompanying handout I will post at the end) useful.
Introducing the Topic:
I'm going to start out my lesson with an object lesson that I'm pretty sure I found on Sugardoodle. I have bought a bounteous variety of candy and candy bars and I am going to lay them out on a table and tell the girls they are each fifty cents. Then I'm going to hand them a packet of coins to "buy" them with. Each girl will have a slightly different amount of money, but none of them will have fifty cents. The rule is that they can't share money. There has to be another way of getting to fifty cents. While they are looking in their packets of coins, I'm going to pull out some coins and lay them on the table by the candy bars. The point is for them to ask me for the money they need to make up the difference.
After everyone has their candy, we are going to dissect the heck out of this object lesson.
What do the candy bars represent?
What does the money they started with represent? (Including the shortfall.)
What does them asking me for money represent?
What does my money represent?
Why can't they share money?
Why am I so willing to give them both money and candy?
What if they were too afraid/embarrassed to ask me for money?

Read 2Nephi 4:17-21. Emphasize that Nephi wasn't a bad or wicked person and yet he still felt weighed down by sin. He chose to trust Christ, though, and that helped him feel supported in his afflictions and filled him with love. That thing that helped and supported him was grace.

It seems like grace is really easy to explain and understand when related to money. I also want to go over another great analogy for grace was written by Stephen E. Robinson (a professor at BYU that I took a New Testament class from a long time ago) called The Parable of the Bicycle. It can be found HERE. Also, if you've never read it, I highly recommend reading Believing Christ, which is the book he wrote that the story originally appears in. It is a very in-depth look at the Atonement including a whole lot of information on grace from many different angles.

Then we're going to talk about the difference in believing that Christ can help us attain salvation, and actually trusting him to make up for our shortcomings. We will probably also discuss what it means to attain perfection and also what it means to try our best to work towards it.

At the end, I'm going to send them home with a little reminder, because I truly believe that a lot of us struggle with the concept of grace - in that we don't allow ourselves to be imperfect and to need help to attain salvation. We are so hard on ourselves and we forget that Christ is there to partner with us and make up the difference.

I pieced this handout together from a few pieces of clipart I found on the web. For my class, in the blank space under the Young Women logo, I have added my signature as the "treasurer" of the bill. I removed that for the sake of posting it for the wide world.
Just right-click on the image to download it. Enjoy!

Tuesday, September 5, 2017

Bundt Cake a la Mario Bros.

This thing was such a labor of love that I don't have any photos of construction (my hands were mostly covered in sticky stuff), but if you are interested in creating a Mario Bros. themed cake, this might be some good inspiration. It wasn't too difficult, I'm just a fondant novice (first timer!) so I had to get the hang of it.
I enjoy "architecting" cakes. This time around, I decided to surprise my son. He asked for just a lemon bundt cake (my favorite recipe HERE). I thought I'd kick it up a notch.

How did I make this?

1) I bought a lovely green porcelain pot at the grocery store that fit perfectly in the center of the bundt cake. I filled it with pressed rice krispie treats, then covered that with Oreo crumbs. I used 8 bamboo skewers sticking out of that, and placed four green plastic straws (two skewers per straw) over the skewers.

2) I pressed rice krispie treats into two plastic rice bowls, then stuck them together to create a sphere. Then I rolled it a little more to make it extra round.

3) I cut out a pie-shaped wedge (sort of pacman style) out of the ball.

4) I covered it with red fondant and smoothed it out as best I could.

5) I filled the mouth area with pink fondant and then fashioned a tongue. To get one layer of fondant to stick to another, brush a VERY little water on the spot and it acts like glue.

6) I rolled out the green fondant and used it to cover the straws and make a couple of big leaves (if you make the leaves out of flat rolled out fondant, you can roll up a bunch of extra into little balls and sort of place them under the leaves to give them some dimension and hold them up a little so they don't look sad and wilted.

7) I cut a bunch of circles out of white fondant, then rolled out a big long tube of white (to go around the mouth). Then I cut out a bunch of triangles for teeth, doubling them up on the bottom half so they would stick up properly.

8) I placed the teeth on the mouth, then covered them with the white tube to shape the white lips.

9) I placed the head onto the skewers (keep that plant stem fairly short and make sure the skewers don't stick up more than a couple inches out of the top of the stem or else (as I found out the hard way) they will stick out the top of the head).

10) After the head is attached, add the spots. (You are getting the benefit of my hindsight wisdom here. I put them on before I attached the head and it was a big disaster that I had to rectify as best I could.)

And that is it! Even though it came out far from perfect, this is one of my favorite cake themes I've ever done. I just think this guy has so much character - just like my now 8yo!

(I had to re-do the stem because the first time it was too long to hold up the head. I actually liked it better shorter.)

Thursday, April 27, 2017

Brunch Quiche and Dreams of Paris

The day before Easter, I bought two dozen medium eggs to boil and dye. I like to dye the medium eggs because they are cute and less of an investment - nobody here really likes hardboiled eggs. Our Saturday got away from us and we never had time to actually boil or dye eggs, and Sunday was even busier. I found myself with two dozen medium sized eggs in my fridge that needed to be used.
At the same time, I had a serious craving for ham with Herb de Provence. When I was in Paris last summer, we bought some ham at a local grocery store, just for making quick sandwiches with, and I was amazed at how amazing the flavor was simply because it was seasoned with a little Herb de Provence. It is such a wonderful aromatic combination of herbs (hello, lavender!), and seems to pair well with ham.
So, I decided to delight my husband with one of his favorite foods of all times, and make him a quiche that he could eat throughout the busy work week. I decided to experiment (because that's what I do!) and came up with my own quiche recipe, and let me tell you: this was the best quiche I have ever had. I HIGHLY recommend making it if you are a quiche-lover. It's definitely not low-calorie, but would be great at a brunch, or a protein-rich start to your day.
And because I'm not a huge fan of blogs that are so filled with photos of the food that you have to scroll forever to find the recipe, here it is right at the top, for your ease.

Ham and Herb de Provence Quiche
Preheat oven to 400*
1 pie crust prepared and in 9" pie plate
(I prefer homemade. An easy recipe is just 1 cup flour, 1/3 cup butter, a pinch of salt and sugar, and a couple tablespoons of very cold water - enough to get the dough to stick together. Add flour, butter, salt, sugar, and combine using a pastry cutter or fork until dough is sticking together in pea-sized chunks, add water little by little until dough sticks together. Form ball, chill for about 15 minutes before rolling out.)

12 medium eggs or 10 large eggs
1 cup heavy cream
1 t Dijon mustard
1/2 t salt
1/2 t pepper
1 t Herb de Provence (you can find it in the bulk spice section of most higher-end grocery stores)
1 T finely chopped chives - more is not a bad thing if you feel like it (just use kitchen shears for ease)
1 cup fresh grated Jack cheese (yes, I know, not traditional Swiss like most quiche, but Jack is creamier, trust me)
1 cup chopped ham of your choice - the better quality, the better the flavor
2 T fresh parmesan cheese

1. In a large bowl, crack eggs, add heavy cream, and mustard, and blend with an immersion blender until it's a bit frothy - at least a minute, two is okay.
2. Add the rest of the ingredients and gently combine so the cheese disperses (you don't want it all clumped up).
3. Pour egg mixture into pie crust. You can top with extra Jack cheese if you want.
4. Bake at 400* for 20 minutes, then turn oven down to 375* and bake for 25 more minutes (total of 45).
5. Pull it out, and give it a little jiggle. If it doesn't move, then double check by gently pressing down on the top middle. If it feels firm, take it out immediately and cool on a rack. You don't want to overcook a quiche - that's how it gets rubbery.
In this case, after 45 minutes, it was set, but the middle was a little soft when I cut into it. That actually makes it really delicious. This quiche has a very creamy texture.
Originally, I made this quiche mostly for my husband, but I ended up eating almost as much of it as he did. It was so good.
And since I'm really missing Paris, let's relive that trip with a couple of photos I took while I was there. It was glorious. I would go back tomorrow if I could. Maybe you can look at them and pretend you are in Paris while you eat the quiche. Au Revoir!
 (We were there for Bastille Day - this was shot from the balcony of our AirBNB.)
 (This is a Chateau in a tiny little town outside of Paris called Maintenon. So very Cinderella.)
 (This is inside the dome of Sacre Couer.)
(This is the Chateau Vaux le Vicomte - also a little ways outside of Paris and well worth a visit.)

Monday, April 10, 2017

Baked Raspberry Lemonade

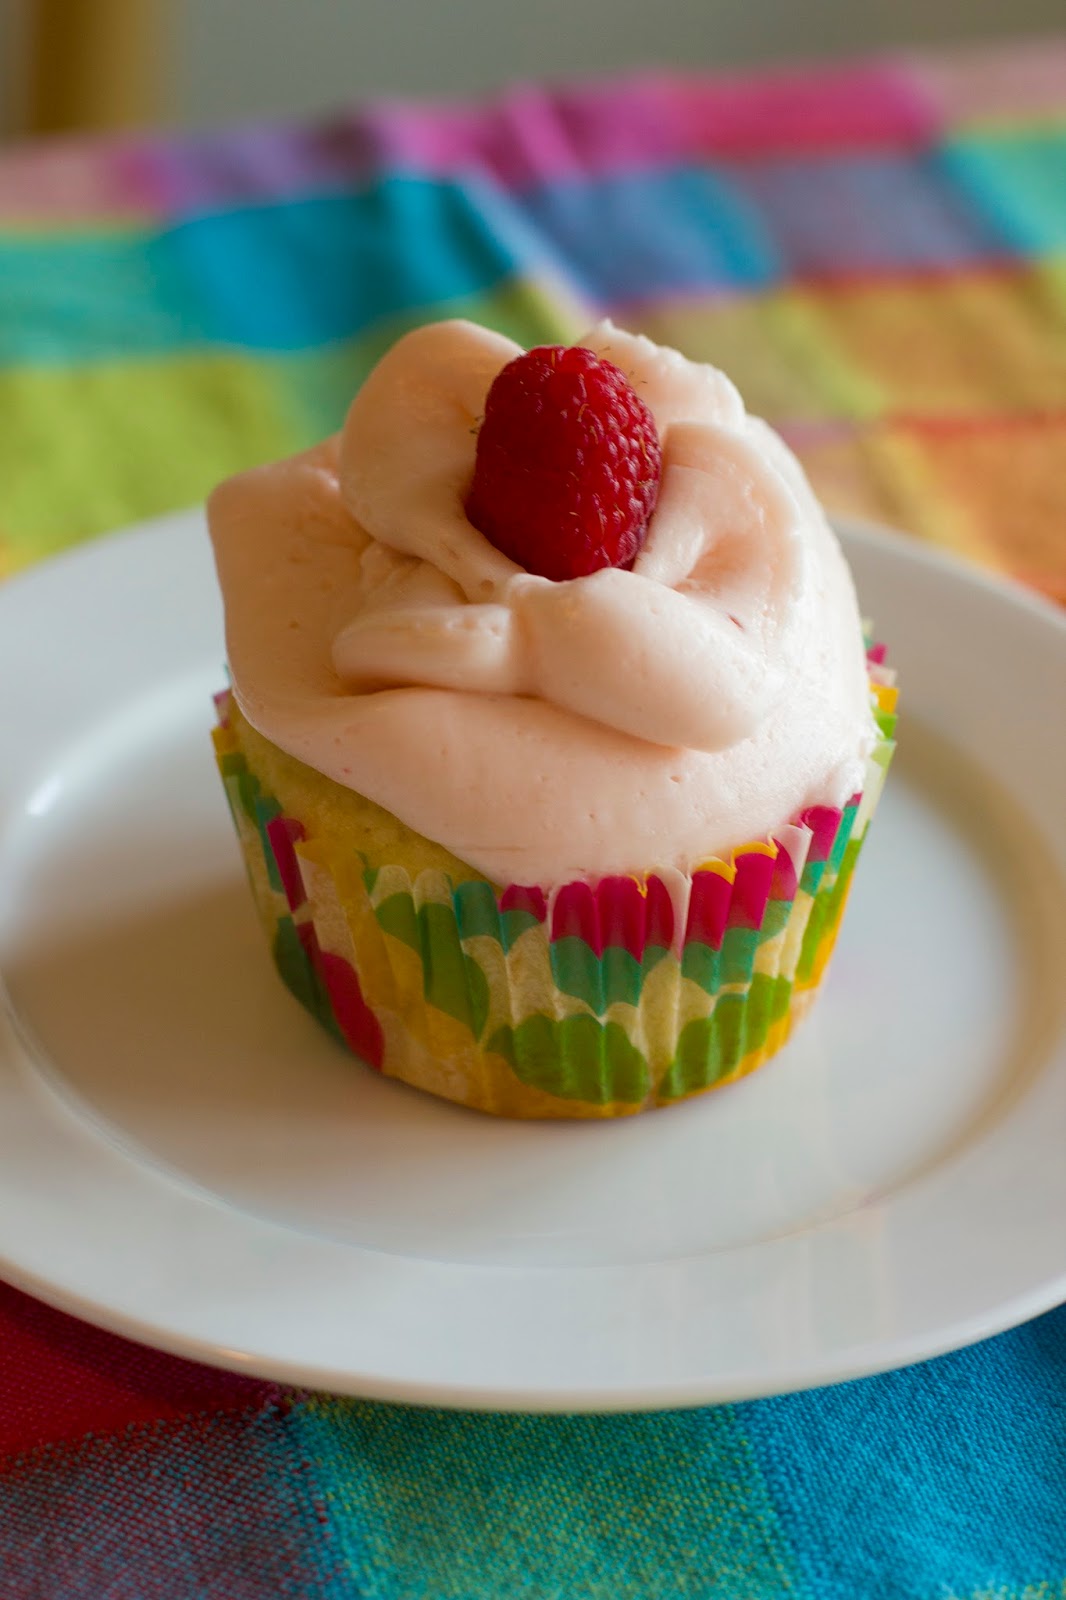
I had the opportunity to make cupcakes for a friend's birthday recently and decided to experiment a little with a cupcake creation. It turned out amazing, and as far as I know (I confess I haven't scoured the web to see if an identical recipe exists), this is an original recipe. I modified my favorite yellow cake recipe into lemon cupcakes, with a fresh raspberry filling and a lemon buttercream frosting.
These are a little bit of work, but they are really delicious and anything but dry and boring. They taste like a little bit of summer in your dessert!
One of the things I hate most on recipe blogs is having to scroll WAY down to the bottom to find the recipe, so let's just dive right in! (Photos at the bottom.)

Raspberry Lemonade Cupcakes - makes 12
Preheat oven to 350*
Cake:
1/2 c coconut oil (melted)
1 c sugar
1 t vanilla
2 eggs (separated)
zest of one large lemon
juice of half lemon
1/4 t salt
3/4 t baking powder
1-1/2 c flour
1/2 c buttermilk

Instructions:
1. In a stand mixer, cream coconut oil and sugar until well combined and a little fluffy.
2. Add vanilla, both egg yolks, zest of lemon, juice of lemon and mix to combine.
3. Add salt, baking powder, half of flour, and mix until just combined.
4. Add half of milk, mix until just combine.
5. Add second half of flour, mix until just combined.
6. Add second half of milk, mix until just combined.
7. Add egg whites and gently fold until just combined.
8. Scoop into 12 muffin tins with liners - spread batter evenly between cups, should be filled a little past half-way point.
9. Bake for 15-20 minutes until cupcake comes out clean. I like to really baby them those last couple of minutes in the oven to make sure they don't get dry.
10. Let cool on wire rack while making filling and frosting.

Raspberry filling:
1 6oz package of fresh raspberries, cleaned
juice of half lemon
1/4-1/2 c sugar, depending on how sweet you want it - I like it more tart
1/4 c cold water
1 T corn starch
1/4 c heavy whipping cream

Instructions:

1. In a small saucepan on the stove, add raspberries, lemon juice, sugar. Bring to a gentle boil and stir occasionally until the raspberries have dissolved and the mixture begins to thicken a bit.
2. Pour mixture through a strainer to remove most of the seeds (I like a few seeds in the final mix, because it feels more authentically raspberry, but I add back in maybe a teaspoon full). Place mixture back into saucepan and back on stove, back onto about medium heat.
3. Mix cold water with corn starch. Add mixture to saucepan and whisk until thoroughly combined - this might take some vigorous mixing to make sure the cornstarch doesn't clump. Boil until mixture becomes thick, remove from heat. Cool until about room temperature.
4. Add heavy cream to mixture, and beat using an immersion blender to whip the cream a bit, until well combined and a little thicker.

Frosting:
2 c powdered sugar
1/2 c unsalted butter
zest of one lemon (If you don't want really lemony frosting, omit the zest for a more delicate flavor)
juice of half lemon
1 tsp vanilla
1/2 c heavy whipping cream
Remaining raspberry filling (I had about a teaspoon left after filling cupcakes)

Instructions:
1. In stand mixer with whisk attachment, combine remaining raspberry filling, powdered sugar, butter. (The little bit of raspberry filling will give the frosting a nice, delicate pale pink color to the frosting.)
2. Add zest, lemon juice, vanilla, combine again.
3. Add heavy cream and whip on high until frosting gets nice and fluffy. (If it appears to curdle slightly, just whip it a little longer. Chances are pretty good it will actually be pretty smooth when spread with a knife or spatula.)

Assembly:
1. Cut a cone-shaped chunk out of the top of each cupcake (see photo below), then gently cut the point off.
2. Scoop raspberry filling into hole, filling almost to the top, and replace the top of the cupcake (again, as shown). You don't want the filling to ooze out of the top.
3. Pipe frosting however you desire. Top with fresh raspberry! (I was testing out a new tip and I definitely need more practice with it.)


Saturday, April 1, 2017

Beautiful Auction Art

As I mentioned in the previous post, our elementary school raises most of its PTA money through a big auction. One of the elements of the auction are individual class projects. These seem to go for quite a bit of money, so there's a little bit of pressure when creating them. I had a fun time doing one of them last year for my son's kindergarten class. This year, I decided to help my other son's third grade teacher with their project. She really wanted to the auction project to be relevant to their current curriculum, so they could possibly use parts of the art project for other assignments in class. After doing a bunch of research looking for ideas, I got my inspiration. We would do a sort of mosaic of drawings and turn it into a poster.
1. I created a square in photoshop and then had a bunch printed out, so each child in the class could make two or three drawings. (Feel free to click on it and download it.)

2. The teacher decided on a theme: in this case, we went botanical, and the kids drew plants, flowers, and berries from a specific region they were studying in class. I could see lots of other potential ideas: animals, elements of the local city, fish, patterns, self-portraits, etc.
3. Each child drew two or three plants, colored them with colored pencil, then outlined the drawings with a fine sharpie.
4. I scanned all of the pictures and brought them into photoshop.
5. I created the big grid in photoshop - the full-size poster with empty squares laid out the way I wanted it.
6. I brought in each picture and placed them in the empty grid, making sure to mix up the drawings because there were duplicates.
7. I brought the grid layer to the top, and switched it to the multiply layer setting so that the drawings would be visible underneath it.
8. I cleaned up any stray colored pencil lines, and erased any drawing parts that fell outside the grid lines.
9. I added the description text at the bottom.
10. I had it printed through mpix.com.

One thing I like about doing auction projects digitally is that they can be reproduced. If an auction project is popular, the PTA can decide to sell a second or third copy for the same price as the first was bid on and double their money. These projects also make excellent end-of-year teacher gifts, or they have the possibility of being permanently displayed somewhere in the school.
The teacher was able to use the scanned drawings for relevant reports the kids were working on, as well as to make some cute thank you notes for a guest visitor to their classroom.

Big Auction Dessert

Our elementary school raises most of its yearly PTA funds through a big auction. We live in a fairly high-rent district (we are the poor people here - LOL), so we can't actually afford to attend the auction, but I can definitely help create the stuff that raises the money. This year, I helped with a class auction project, and then I created a special dessert for the Dessert Dash.
I love an excuse to experiment with cakes - especially when I don't have to eat them (calorie-free experimentation!). This time, I decided to combine two of my favorites: chocolate chip cookies and chocolate cake. Let me start by warning that this is a many-hours process.
Here's how I did it:
1. I made a chocolate cake from scratch in two 9" cake pans, cooled them and froze them overnight. Before freezing them, I made sure to cut them down a bit so they were both as flat as possible. I used THIS recipe (mostly because I had only cocoa powder, no baking chocolate).
2. I baked a full batch of my favorite chocolate chip cookies, making sure to bake a couple of giant ones (more than one in case one came out funky), and the rest fairly small (like a couple inches in diameter). I baked them a little more than I normally would because I wanted the crunch. Alton Brown's chocolate chip cookies are my favorite, recipe HERE.
3. In the morning, I made a 1-1/2 batch of a really fluffy vanilla buttercream frosting. I used THIS one.
4. Place one of the cakes on the plate with a little frosting underneath to cement it down. Cover the top of that cake with a layer of frosting. Chop up a few smaller chocolate chip cookies and arrange them on top of the frosting in a single flat layer. Top that with another layer of frosting.
5. Place the second cake on top of the frosting, and ice the entire cake with most of the rest of the frosting (if there's a little left, put it in an icing bag).
6. While the frosting is setting on the cake (which is nice and easy since the cake is still kind of frozen), make a batch of ganache. Let it cool a bit so it won't melt the frosting. HERE is a recipe for basic ganache.
7. Place ganache in some kind of squeeze bottle (I use the cheap dollar store plastic ketchup/mustard containers). run a line or two of ganache around the very outside edge of the cake so that the ganache runs down the sides. Embellish a little bit by squeezing dots at the edge of the cake where you want more drip. Then cover the entire top of the cake with a layer of ganache. You will have leftover ganache. Do find some other way to enjoy it.
8. Arrange big cookie in the center of the top of the cake, and then embellish as you like with the smaller ones around it. If you had extra frosting like I did, I added some decorative frosting to the top.

Tuesday, November 1, 2016

Building Pea Shooters Take TWO!

This year, my boys ALL wanted to be various Pea Shooters, so we dressed my husband up as the zombie and it was great fun. Since I had created a Pea Shooter the previous year, I already knew what I was doing! Wahoo! So, here is an Ice Pea, A Fire Pea, and a Repeater Pea (just repurposed last year's pea shooter by adding eye brows and a couple more leaves - easy-peasy - see what I did there?). Tutorial from last year found HERE. And then here are a few construction photos I took along the way. The ice pea crystals were really hard to get to stay. I used a whole lot of tacky glue and then also thumb tacks underneath sticking into the foam core. I also brushed the Ice Pea with iridescent glitter paint.


I will admit we lost a couple of the crystals on our walk that I had to pocket and reapply. Oh well. It was also a little back-heavy, so my son had to kind of hold the face hold down.
And the finished product. I am so glad our neighbor decorates her front yard so well for Halloween! Perfect for our theme! This was such a fun photoshoot.

 (He wouldn't let me paint his face. HAHA!)


 My kids told me they felt like celebrities, because so many people stopped them to compliment them on their costumes.
We are urban dwellers, so we trick-or-treat at businesses instead of houses. It's actually really fun.

Wednesday, September 7, 2016

Birthday Zombies

The final birthday cake request of the year came from my middle son. He wanted a Plants vs. Zombies cake. Again, I didn't find a lot of (amateur) PvsZ cakes on Pinterest, so I had to go my own route. This one is actually really easy to make as long as you own a set of THESE - no, I didn't make fondant creatures because who has time for that???
So, here are the mechanics of the cake:
1. I made my cake of choice (he wanted lemon with a lemon curd filling) in two standard-sized square cake pans.
2. I frosted the cake with regular ol' white buttercream frosting.
3. I scored a 6x6 checkerboard pattern into the top of the cake lightly with a butter knife.
4. Using two different shades of green frosting, and a leaf/grass frosting tip, I filled in each square in different directions to create the "game board."
5. I took the left-over green frosting and created grass blades on the sides of the cake, just to give it a little extra flair.
6. I placed the figurines in a somewhat believable manner.
Voila! PvsZ cake that took very little time.
Here it is with its thrilled recipient!


Sunday, July 31, 2016

Buttercream Creeper Cake

My now NINE-year-old requested a Minecraft Creeper cake this year for his birthday. Since I love making these cakes for my kids, I agreed. I spent some time googling and looking on pinterest for ideas and was really surprised to only find about two Creeper cakes out there, so I was pretty much on my own after looking at how to get the initial shape (I am not into fondant for lots of reasons for these kid-cakes and that was pretty much what I saw).
So, here is what I did:
1. I made my favorite chocolate cake recipe and baked it in two 7x11 Pyrex baking dishes.
2. I turned them out to cool and then on a cutting board, sliced longitudinally about 1" off all the way down both sides of one cake to create the body - removing the rounded edges.
3. With the other cake, I created the head to be a little bit wider than the body, and square. With the rest of that cake, I made two feet, also square.
4. I placed the cakes on a foil-covered cookie sheet and then iced the entire cake with green buttercream frosting (and it was really good buttercream frosting).
5. Using green sugar-sheet, an exacto knife, and a metal ruler (I'm an architect, remember, always at home with a ruler and an exacto knife), I created a whole bunch of 1.25" squares.
If you've never used sugar sheet, it's awesome! You can cut it with an exacto knife or scissors just like paper, then you peel off the plastic backing and stick it right on the cake. It is edible (though not terribly tasty). A great way to accomplish these sorts of designs without using fondant or going nuts with detailed frosting.
6. I placed the squares throughout the body and feet in a somewhat random geometric grid pattern.
7. Using black sugar-sheet, I created three more 1.25" squares for the eyes and part of the mouth. Then I cut a fourth square, cut it in half vertically, and used it to create the sides of the mouth.
8. To clean up the edges of the cake a little bit, I piped a line of frosting around the base of the cake, and a narrower line to outline the different sections of the top of the creeper.
9. I finished it off with a happy birthday message and green candles.
This was actually a pretty easy cake to make compared to that dinosaur I made back in June. And it was a hit!


For my third son's birthday, I hear I am going to be creating a Plants vs. Zombies yard. Wish me luck! Be back in September.

Sunday, June 12, 2016

Birthday Dinosaur

We celebrated my youngest's third birthday this weekend. More than anything, he wanted a blue stegosaurus cake. I enjoy a cake challenge (I really do), so I spent a good couple of weeks thinking about it and was really anxious to make it a reality.
I didn't take any photos of the process, mostly because I had food coloring and frosting all over my fingers, but I can describe the process for anyone who might want to recreate it.
Here goes...
The body:
~I started with three round 9" cakes and one 8" square.
~I cut off about 1/3 of each of two round cakes for the body, and stuck them together with a lot of frosting.
~The third round cake I cut out the tail (sort of a J shape, that I then had to tweak when I put the whole thing together).
~Out of the left-overs of that third round, I cut the head - sort of half an oval that was two cake-widths wide.
~I cut the 8" square into 4 equal pieces and then cut one leg out of each quarter.
~There were some left-over chunks, and so I used those to add shape to the head and a couple of triangles to connect the flat tail piece to the hump of the body.
~Then after I put the whole thing together, I frosted the heck out of it.

The spikes:
~I created the shape of one of the spine on a piece of paper. Then I laid it under a large piece of wax paper on the counter.
~I purchased a bag of candy melts at the craft store (in a dark blue color).
~I melted them in a pyrex bowl in the microwave and then poured the contents into a squeeze bottle.
~I traced the shape of the spines and then also filled them in with the melted candy. Moved the paper and traced over again. Repeated a bunch of times. Then I made a few smaller spines.
~I stuck two toothpicks in each of the big spines lollipop-style, so I could easily connect them to the cake later.
~I was having so much fun making stuff with the melted candy in a squeeze bottle that I made a bunch of embellishments that I wasn't sure what I was going to do with.
~After everything dried, I took a knife and trimmed all the spines so they were nice and sharp.

After I frosted the cake, I added all of the spikes and threw on some embellishments. Then, because where the cake meets the plate/cookie sheet/whatever always looks messy, I added some "grass" and "dirt" with the leftover frosting.
This might be my favorite kid-cake that I've ever made. I was really sad when we cut into it. Here is my masterpiece!

The birthday boy loved his cake!
We also had stegosaurus fruit salad. It was a fun party theme!

Wednesday, March 16, 2016

Big Bad Rash

My middle son came down with a strange rash in mid-January and as of a week ago, we were STILL trying to figure it out. It was the kind of thing that started out small, concentrated to one area (on his rear end, unfortunately), and then spread like crazy. It became infected, and then it just spread and spread until he covered his whole body. It was itchy and painful, and I have no idea how he handled it with as much grace as he did. We went to the doctor SEVEN times over the evolution of the rash. SEVEN. The curious thing was that as it ran its course, the most stubborn part was (so embarrassing) in the shape of a toilet seat on his backside. It just wouldn't go away and it was blisters on top of blisters.

Finally, last week, the dermatologist (by the way, did you know it's almost impossible to get a kid in to see a dermatologist???) decided we should do patch testing to see if he had any skin allergies. Over the weekend, he had to wear this series of little patches (all stuck to medical tape) on his back, then after 48 hours, we could remove them and see if he had any reactions. It turned out, he had a pretty big reaction to something called methylisothiazolinone (abbreviated MI). It is an anti-microbial chemical found in SO MANY THINGS. SO MANY THINGS. After three days, he still has a red square on his back where that patch was. (Incidentally, the doctor ruled the Q15 reaction an "irritant" and not an allergy - probably should avoid that too, and it goes by literally 12 different names in products.)
What seems to have happened is that when he got the rash, I was worried it might be contagious, so I started furiously cleaning all bathroom surfaces frequently to keep the other kids from getting it. The Clorox (well, Kirkland) wipes I was using had this allergen in them and it was actually intensifying the problem. I ended up having to replace the kid-toilet-seat-topper (the one we had was kind of a spongey material that was potentially porous -ick) with a hard-plastic one and change my cleaning routine. The rash began to retreat almost immediately. This allergy also explained why he had had such horrible rashes as a baby when we used ordinary diapers and wipes. We had to move him to very organic stuff early on in life. Only a few brands didn't irritate him. Turns out those brands didn't contain MI. Through the years we have inadvertently shielded him from MI in most things just due to thinking he had sensitive skin and the desire to use organic/natural baby skin products on all of our children - mostly to avoid phthalates, actually. And I also went through and eliminated all triclosan-containing products from our house a few years ago too (scary stuff, it's even in toothpaste).
After the test results, and confirmation of the allergy by the doctor, my research and label-reading began. I thought I would post what I learned here in case there are others out there who learn of an MI allergy. Obviously, it is probably healthiest to make as many cleaners at home from known ingredients like vinegar and peroxide, but I just don't have time for a lot of that right now - life is particularly stressful at the moment, so I needed to be able to purchase things quickly to get us by for awhile.
Here are a few quick things to start with:
1) MI is found in all sorts of soaps, detergents, and skin products mostly.
2) MI is found in a lot of "natural" products, and there isn't a certain brand that I could find that is exclusively free of them - you have to pick and choose and read a lot of labels. Honest Co., for example, is currently being sued for being less than honest about what is in some of its products. I did find, though, that a lot of their stuff is MI-free - in fact, the only dish soap I could find at Target that was MI-free (include Seventh Generation, and Method) was Honest Co.
I spent quite awhile reading labels at Target this morning in the "natural" section and most of this stuff contains MI! So sad!

3) As far as detergents go, powders tend to less-frequently contain MI than liquids.
4) "Sensitive skin" and "fragrance free" products are less likely to contain MI, but not always a guarantee.
5) Sprays tend to be MI-free while lotions tend to contain it.
6) I learned that a lot of cleaning products are very vague as to what is actually in them. They are not required to list their ingredients on labels, so a lot of them don't, or they only list "active" ingredients. Greenworks is a particularly bad offender at false-advertisement. They do list ingredients, but in vague ways that don't actually let you know what chemicals their products contain.
7) Just because it says "plant-based" doesn't mean it is totally safe. My beloved Aveda products (I am so addicted to their smell) have MI in them, I sadly discovered.
I also discovered that quite a few - perhaps MOST - Mrs. Meyers products contain MI. I was surprised and disappointed to see that.
I also spent 20 minutes at Whole Foods reading the labels of all their cleaning products and most of them contain MI, sadly. I think this one makes me the most angry. Look at the claims this container of wet wipes makes, but it still contains MI!

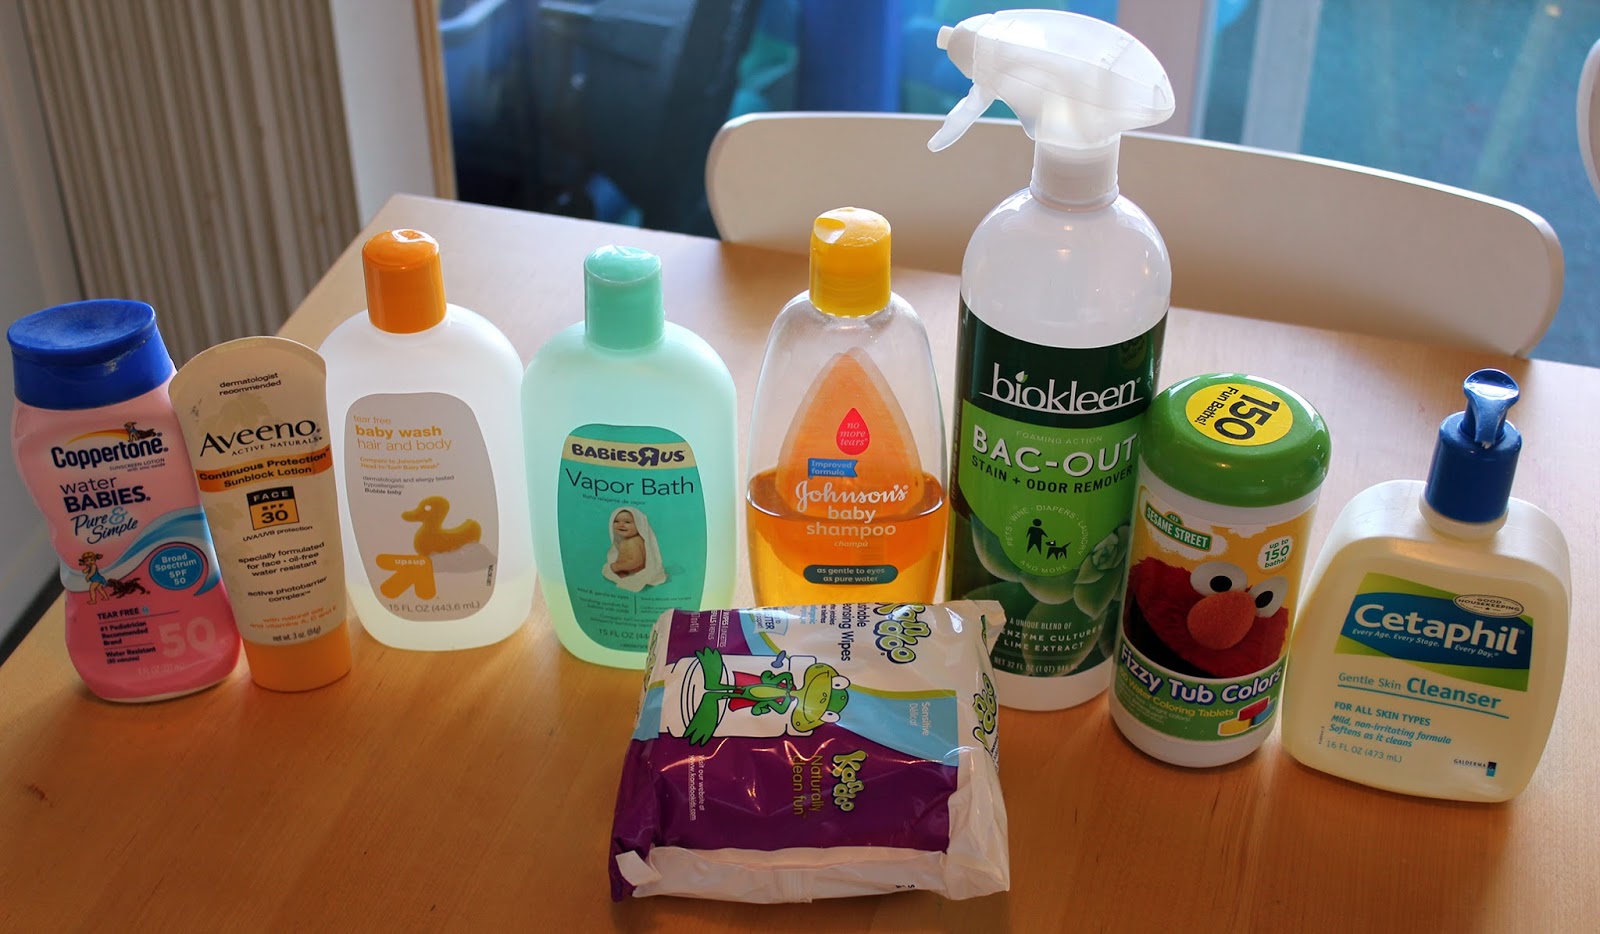
Here are a bunch of products I either purchased today, or had hanging around our house that do NOT contain MI. Note that I am not suggesting that all of these are pure and natural (though a lot are), just that these do not contain this one allergen that bothers my son and many other people out there. This is a pretty broad range of products that are not too expensive and get most of the job of cleaning self and house done.
 L to R: Aveeno Baby Lotion (unscented), BabyGanics unscented bubble bath, Trader Joe's handsoap, Honest Co. dishsoap, Seventh Generation disinfecting wipes, Neutrogena Naturals face soaps, Method glass cleaner (in a refreshing mint scent), Method surface cleaner (but note that other Method products like hand soap and dish soap do contain MI), Aquaphor, Trader Joe's plant-based laundry detergent (only has three ingredients!), Dr. Baronne's Castille soap (the lavender stuff smells amazing - I am totally into lavender in the shower right now), Everyone Soap for Every Kid (LOVE the wonderful orangey smell of this stuff), Curel unscented lotion (note that only unscented doesn't contain MI).
L to R: Coppertone Pure & Simple sunscreen, Aveeno face sunscreen (though I don't like this stuff because of some other chemicals it contains), Target's Up & Up baby wash, Babies R Us vapor bath (great stuff for head colds), Johnson's baby shampoo, Kandoo sensitive skin flushable wipes (only the unscented kind), Biokleen bac-out carpet cleaner (Folex and Resolve do not list ingredients), Fizzy Tub color tabs (hey, what can I say, we went through a phase where that was the only way one of my kids would set foot in a tub without a tantrum), Cetaphil cleanser (awesome stuff anyway, even better that it has no MI).
And here's to many years ahead of obsessive label-reading!

Friday, December 25, 2015

Bring on the Cookies 2015 Edition

This year's Christmas cookies! I was able to use my gingerbread skyline to decorate the plate, which I thought turned out really cool! I will have to remember that for future years.
This year I didn't spend a ton of time making Christmas cookies, although I gave more away than I ever had before, which was fun. I made (going L to R starting at the top):
1. Chocolate Crinkles - it just isn't Christmas without these
2. Homemade Marshmallows (if you've never made homemade marshmallows, do it NOW - coolest science experiment out there, and tasty too)
3. Gingerbread Cookies (this recipe makes A TON - as in 3 gingerbread houses, a gingerbread skyline and about 3 dozen cookies - so unless you want to make this many cookies, half it for sure)

4. Orange/Cranberry macaroons - use this basic recipe and add zest of one orange, and dried cranberries to taste (about half a cup is fine)
5. Spritz
6. Mini Chocolate Chip macaroons (they taste like Mounds bars) - same basic recipe as above. Substitute almond flavoring for vanilla, and stir in about 1/2 cup of mini chocolate chips
7. Fudge (I tried a new recipe. It was super-goopy. I don't recommend it. I'm not linking it.)
È